

Sole Purpose 14
What Pathologists Wish Podiatrists Knew
What Pathologists Wish Podiatrists Knew
Over the past month, I've had the exceptional opportunity to work in a pathology lab as part of my off-service rotations during my fourth year. Although I had some experience with lab work during undergrad, I wasn't entirely sure how pathology would directly relate to my future career in podiatry, aside from knowing that I would likely be sending samples eventually. Prior to starting the rotation—mind you, after being informed that I had to complete my pathology rotation rather than opting for another podiatry month—I made a conscious decision to see it as a valuable opportunity.
I recognized it as a chance to understand how the tissue samples I'll be sending in the future are processed and examined, which will undoubtedly enhance my ability to educate patients about the process. Throughout this month, I've learned an incredible amount, and it's been a truly enriching experience. Therefore, I'd like to share some key insights on what pathologists wish podiatrists knew.
Week 1: Histology and Nail Samples
During my first week, I assisted in preparing nail samples for fungus evaluation. One of the main frustrations observed was the submission of tiny nail clippings or mere dust from Dremel usage, making sample preparation extremely challenging. After discussions with the pathology techs, here are some crucial "Do Not Dos": do not send toenail shavings (with one exception) or nails with nail polish. Also, please ensure that the paperwork is properly filled out and legible (though I've become adept at deciphering doctors' handwriting for the staff).
The correct method for preparing of a typical fungal nail sample is as follows: begin by wiping the nail with alcohol. Then, debride and discard the distal nail, as fungal infection typically penetrates deeply within the nail, and the distal portion of the nail often yields false positives. For a good nail sample, you would want at least 3-6mm of nail. Discarding the very distal tip of the nail may seem counterintuitive however, the fungus moves move proximal towards the nail matrix, so the most amount of fungus can be found there, proximally. There is fungus everywhere in the world and just a tiny bit of fungus under the distal nail is not a true fungal infection.
There are different approaches depending on the suspected type of nail fungus. For proximal subungual fungus, a punch biopsy near the base of the nail is recommended. Superficial white fungus is one of the few exceptions where sending shavings or scrapings is adequate. In the case of a severely dystrophic onychomycotic nail, it's best to remove the entire nail. However, it's important to note that some patients may not agree with this method of sample collection.


Week 2: Surgical Pathology
During my second week, I spent time examining biopsies under the microscope. The pathology tech even questioned if I had ever used a microscope before, to which I chuckled and explained my background in biology classes and lab work during undergrad. We examined biopsies from various parts of the body, searching for abnormalities and budding fungi on nail samples. Despite sounding mundane, the samples were visually captivating and reminiscent of artwork. This week served as a refresher for histology concepts from my early medical school years.
Key takeaways included the importance of providing additional information with samples, such as biopsy location, patient history, and prior treatment, along with clear instructions for the pathologist.
Ensuring quality specimens are preserved in appropriate solutions is paramount. For instance, gout samples should never be placed in formalin, as it causes degradation of gout crystals. Instead, they should be preserved in a cytolytic solution. Moreover, when conducting a punch biopsy on an ulcer, it's imperative to obtain samples from both central and peripheral areas. Peripheral samples assist in ruling out various types of vasculitis, while central biopsies aid in ruling out malignancies.
Additionally, when performing a nail biopsy, such as in cases involving a Hutchinson sign or a black streak extending from the nail matrix, it's crucial to take the biopsy beyond the lunula to where the black line begins. Furthermore, the biopsy should be full thickness to the periosteum to ensure proper Breslow scaling.

Week 3 and 4: Molecular Pathology
During this week, I delved into the process of preparing samples for polymerase chain reaction (PCR) tests and interpreting the results. Once again, paperwork was emphasized, stressing the importance of accurately filling out requisition forms with diagnosis codes, collection dates, collection sites, and patient information.
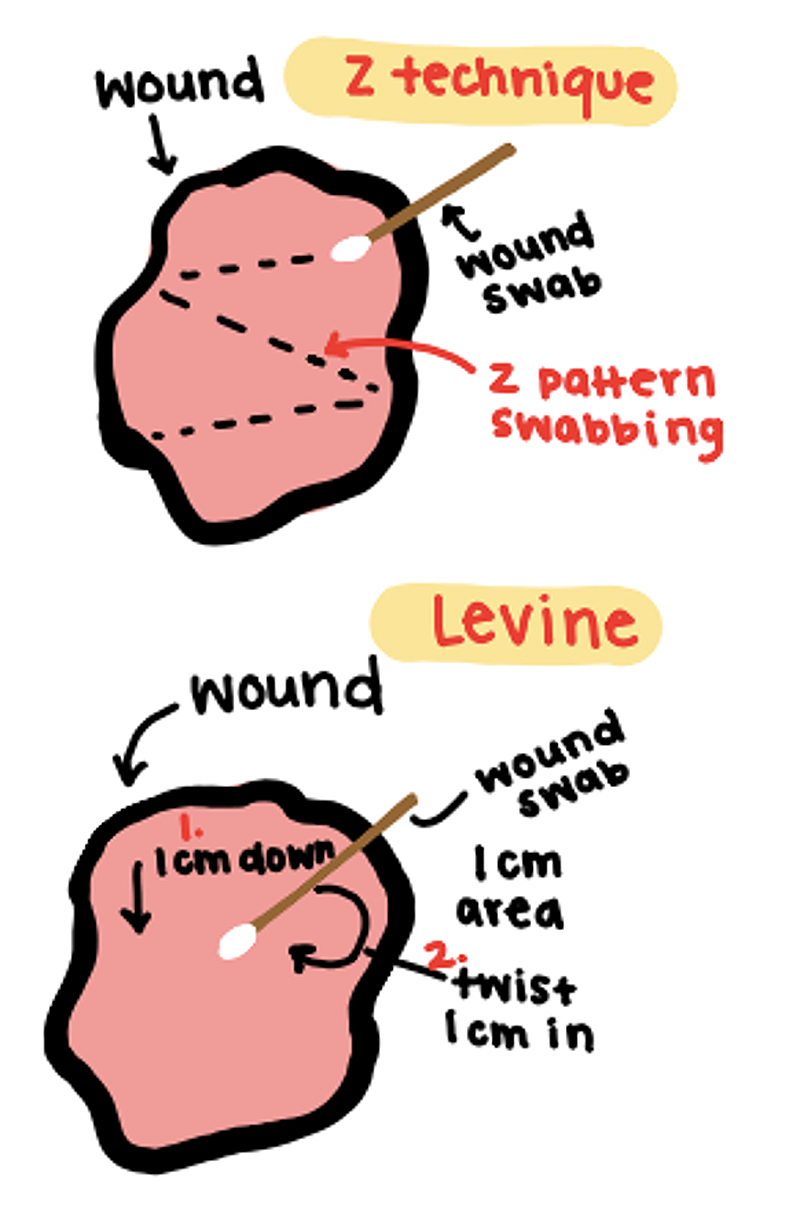
The most valuable lesson of these weeks was learning the proper technique for obtaining wound culture samples. Two techniques were highlighted: the Z technique and the Levine technique. The Z technique of obtaining a wound culture sample, involves making a superficial sample in a Z-shaped pattern over the wound site , staying superficial. While the Levine technique, considered the gold standard, entails locating the leading edge of infection, applying firm pressure, and rotating the wound culture stick for 8-10 seconds. Additionally, I learned about the challenges of growing anaerobic bacteria and the significance of utilizing PCR in such cases.
In summary, the majority of complaints centered around paperwork errors, insufficient information, and challenges in obtaining and handling samples correctly. I'm immensely thankful for the chance to participate in pathology this month and for all the knowledge I've gained. A heartfelt appreciation goes to Dylan Bach, MD, MBA for being an exceptional teacher and for dedicating time to my growth as a student!


Overall sponsorship of PRESENT Podiatry was made possible through
the support of our sponsors:
Grand Sponsor


Comments
There are 0 comments for this article