

Sole Purpose 29
Reading a Radiograph
Reading a Radiograph
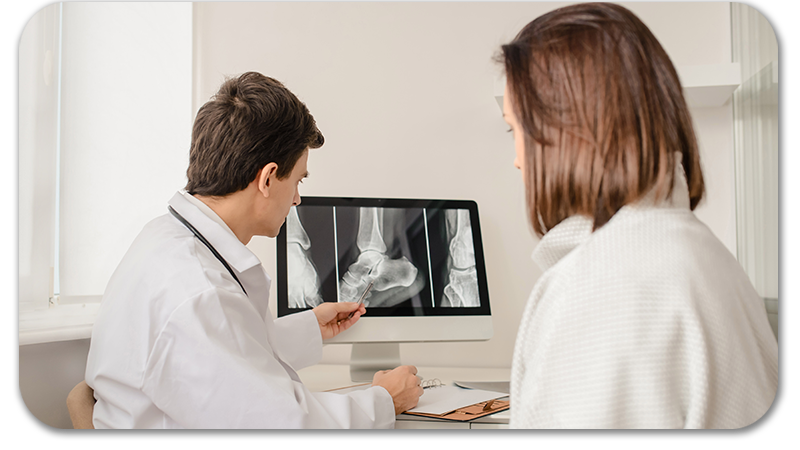
Last year, I went skydiving with my little brother for his 24th birthday. As I sat in the plane, about to jump out, I was shockingly calm and found myself laughing. Why? Because I realized that tandem skydiving with a skilled instructor wasn't nearly as scary as being called on to read a radiograph during academic sessions on externships. While jumping out of a plane didn’t scare me, I would regularly break into a cold sweat when presenting a patient to my attending.
Yes, having the spotlight on you is terrifying. But practicing radiograph reads as often as possible is essential, especially before residency interviews. Whenever the opportunity presented itself, I was ready to nervously volunteer—respectfully and without seeming overeager—to practice a read during our school's academic sessions. I also started attending residency programs' academic sessions as a third-year student to listen to others' reads and take notes.
So, in today's article, I want to detail how to read a radiograph and prepare for radiograph reads in residency interviews. I promise it’ll be less nerve-wracking than skydiving—though maybe just as exhilarating!
Know Your Audience
Know who is asking you to read the radiograph. If you aren't sure, ask if they want a focused read. Some programs prefer a very specific read, while others will roll their eyes if you say more than five words. In all the imaging reads I've done, I've never mentioned specific angle degrees. Instead, I usually describe findings as increased, decreased, within normal limits, or not present. What is a quick read, you may ask? It means saying what you need to say briefly and concisely. Some attendings don't want any fluff (I got in trouble for this all the time as a student because I love fluff). Quick means quick.
Have a One Liner
I started every read the same way unless I was instructed to do a focused or quick read. In that case, I would describe whatever was going on specifically. Otherwise, I always began by stating the view I was looking at (eg, Foot AP, medial oblique, lateral oblique, lateral, sesamoid axial, ankle AP, ankle mortise, ankle lateral, Isherwood, etc). I would also mention whether it was a weight-bearing or non-weight-bearing radiograph and specify if the individual was skeletally mature or immature.
It's easy to panic, but if you've practiced your opening line enough, you can feel confident right off the bat. It's also important to note that if the radiograph shows trauma or there is a splint present around the foot and ankle, it is probably a non-weight-bearing view.


Have a System
There are different ways people go about their system. When describing a focused view, I start with my general one liner that I described above. I then prefer to start distally and then move proximally. Another method I have heard people use is the acronym SCUBA.
S – soft tissues
C – cartilage
U – unique findings
B – bone
A – alignments
I prefer to go from distal to proximal because it allows the person I am doing the read with to follow along with me, whereas the SCUBA method can feel erratic. I also like to mentally trace along each bone to look for any abnormalities. My radiograph reads started PAINFULLY slow and awkward but the more you practice, the more the small abnormalities will scream out at you and the faster you will get. Start with one view before moving onto another.
You also should have general angles that you ALWAYS mention depending on the read (if it is not a focused quick read that they want).
For Example, for Hallux Valgus:
On DP:
- Intermetatarsal angle (should be increased in a bunion)
- Hallux abductus angle (should be increased in a bunion)
- PASA – Proximal articular set angle (within normal limits or deviated)
- DASA – Distal articular set angle (within normal limits or deviated)
- Tibial Sesamoid Position (1-7)
- Hallux interphalangeal angle (increased, decreased, within normal limits)
- 1st MPJ joint (joint space narrowed, spurring, etc)
- 2nd toe is (adducted, abducted, straight) at 2nd MPJ
- Metatarsal Parabola
- Metatarsal adductus angle (increased, decreased, within normal limits)
- Kites angle (increased, decreased, within normal limits)
- Talar Uncovering angle (increased, decreased, within normal limits)
- Cuboid Abduction angle (increased, decreased, within normal limits)
On Lateral:
- Calcaneal Inclination Angle
- Talar Declination Angle
- There is an anterior/ posterior break in the cyma line
- There is a (positive, negative) Kirby/ Bullet hole Sign
- Mearys Angle
- Seibergs Index
- Comment on 1st MPJ if there is any exostosis of note
In General:
- Soft tissue edema, medial eminence
- Any hardware presence or evidence of prior surgery?

For an Ankle Fracture:
I typically start laterally and then move medially. I find starting with the fibula helps me stay calm and it helps with Lauge Hansen Classification.
On AP:
- Fibula – is there any shortening, what type of fracture pattern is present, is there any rotation? Angulation? Is the fracture open? Dime sign?
- Tib-Fib: Clear space, overlap
- Misty mountain sign – indication of a posterior malleolar fracture
- Medial malleolus: is there a fracture? What type of fracture? Increase in medial clear space?
- Talus
- Talocrural angle congruency
- Shenton's lines
- Translation/ dislocation
- ONLY classify if asked to classify, do not get yourself into a trap early on and it is always better to look at multiple views
On Lateral:
- Are there any spikes present
- Posterior malleolar fracture
- Is the talus translated, dislocated anterior or posterior
- Any open fractures?
Other:
- Is it splinted? Is it well reduced? Is there hardware already present? What type of hardware?

Using the Proper Terminology
During my externships and third-year rotations, I quickly learned that some attendings do not like radiographs to be referred to as “X-rays.” The term "X-rays" refers to the radiation that produces the radiographic image, not the image itself.
Additionally, unless explicitly asked or you know the person you are presenting to always wants a diagnosis, you should avoid making a diagnosis in your read. For example, instead of saying it is a fracture, describe it as a cortical disruption or a break in the cortex. Use terms like "soft tissue emphysema" instead of "gas," unless instructed to give a very quick read.
There is also very specific terminology used when describing tumors, which is a common topic in interviews and board exams. Examples include "ground glass opacities," "geode," "onion skin," "stippled appearance," "sunburst," "mosaic," and "lamellar."
If You Don’t Know, Don’t Say It
If you're unsure about something and are not directly asked about it, avoid mentioning it and potentially stumbling. Additionally, don't classify or give a diagnosis until you're asked. This can help prevent feeling overwhelmed or digging yourself into a hole. Just try to avoid this situation altogether.
Practice Makes Perfect
Practicing reading radiographs can be intimidating, and you might feel like your mind goes blank when you're put on the spot. Remember to take a deep breath and follow a systematic approach. The more you practice, the better you'll become, so don't be afraid to put yourself out there and try!
If a resident is not busy and clinic or call is slow (coming from a current swamped intern who works with students, please make sure they are not busy with something else), you can always ask them if you can practice a read. Remember to read the room when asking for extra practice.
I hope this helps all the students out there! I’m sure you’re doing great, and as a resident who works with students, there's nothing better than seeing your radiograph reading skills improve with time and practice. Good luck, everyone!


- Radio I Exam I Biomechanical Angles.pdf
Follow this link - Radiograph angle assessment.pdf
Follow this link
Overall sponsorship of PRESENT Podiatry was
made possible through the support of our sponsors:


Comments
There are 0 comments for this article